THE 1967 ELDORADO RESTORATION - WHAT WE HAVE LEARNED SO FAR...
Whenever you restore a car you can learn a lot about it. The ongoing restoration of my 67 Eldorado is taking a little break now, and here is a summary of things we have learned so far during the restoration process:
There seems to be a design and/or production problem at the front windshield which causes rotten floors and rust in the A- pilar:
Although my car is a low mileage car (28k miles) with no other real rust issues, the front floor of my car had to be replaced as we found out when the carpet was removed. I have heard some similar stories from fellow Eldorado owners who had the same problem with their cars. Some of them owned very low mileage texas cars and had rotten floors and/or rust in the A-pillar. The water seems to enter at the A-pillar and often causes rust through holes there. It can then seep into the car, where it ends on the front floor, from where it cant evaporate due to the rubber insulation used underneath the carpet. When the windshield on my car was re-installed, we made sure that it seals perfectly and we used some modern material to make sure there wont be any future issues. The front floor on my car had to be replaced as you can see on the pictures of my restoration gallery.
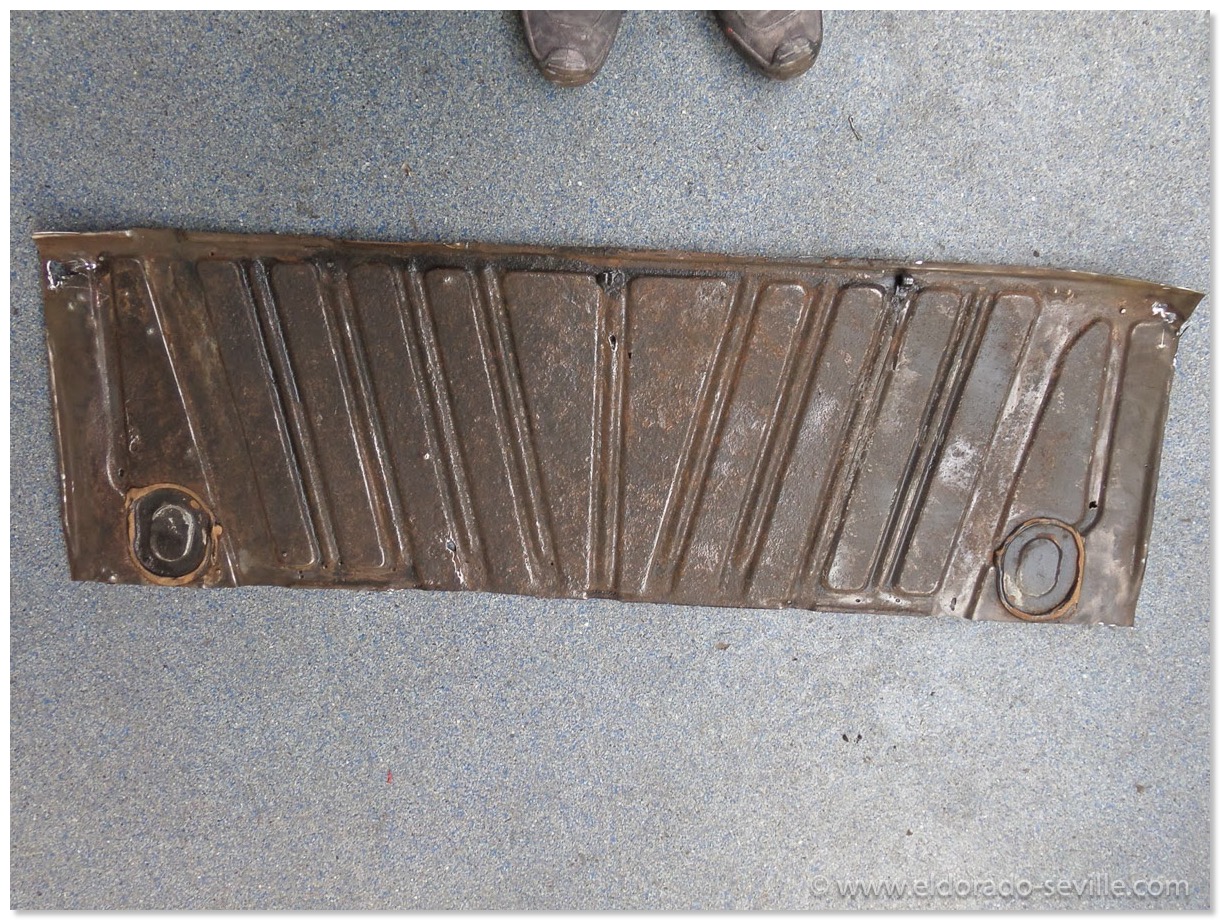
The cut out front floor.
Reproduction decals were not reproduced very accurately:
All the reproduction decals I bought until now - for all of my cars-, look similar to the original decals at first sight, but are different in many details if you look closely. The company reproducing them did not care to use the same font, font size, letter sizing and spacing or in some cases even the same size of the decals.
If you order the 1967 trunk jacking instructions from any of the big suppliers, you will get the one from a 1969 Eldorado, which is white instead of silver, and larger than the original ones and shows a 69 Eldorado. If you order the one from a 68 Eldorado, you get one for a 67 Eldorado showing a 67 Eldorado.
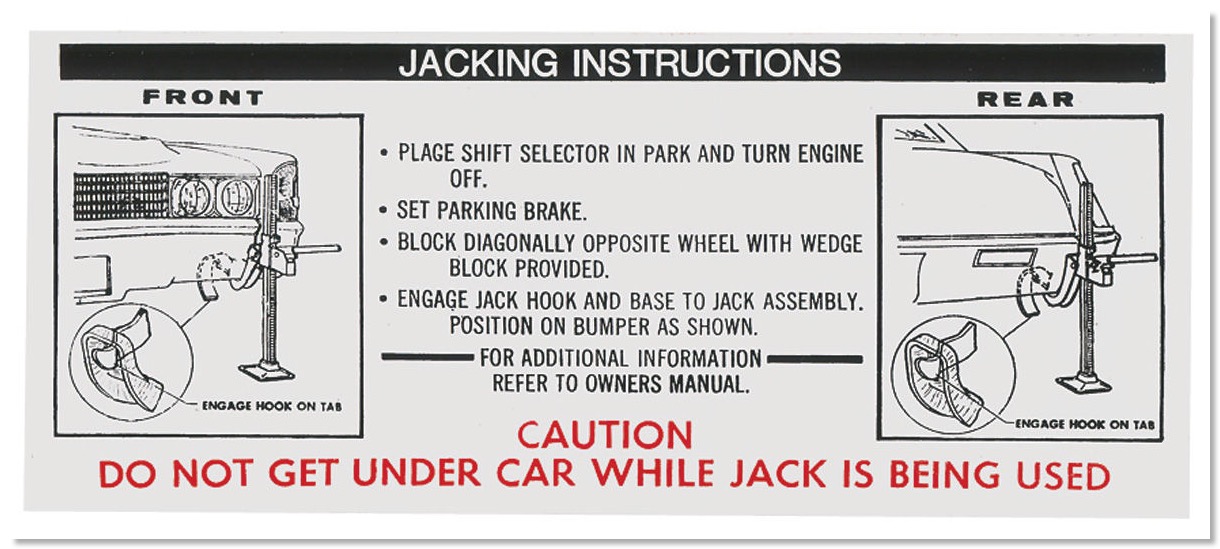
If you order a 1967 Eldorado trunk jacking instructions you will get this one from OPGI or Rubber the Right Way. It clearly is not for the 67 Eldorado.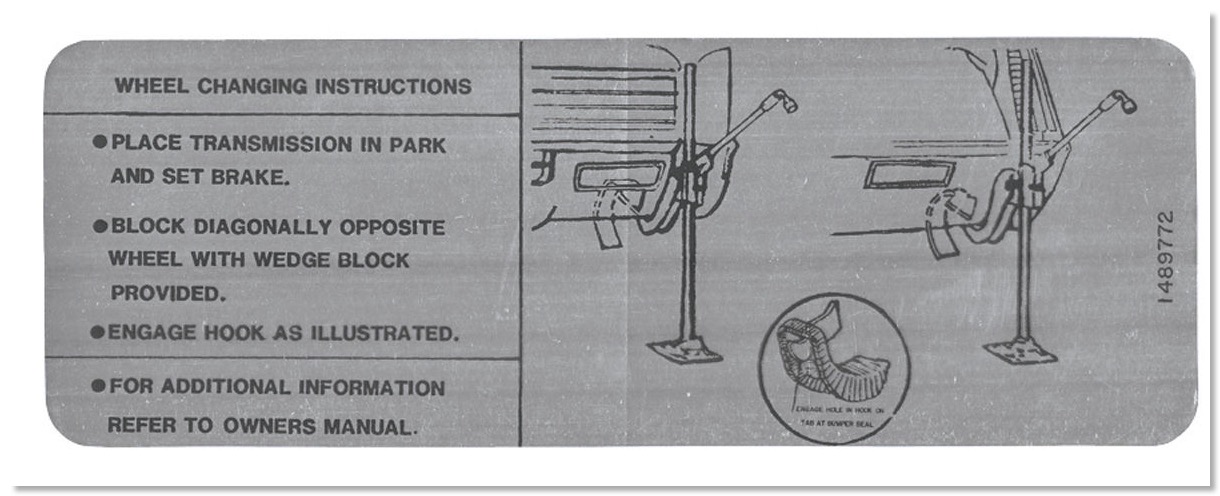
This is how the 67 trunk decal should look like, but it is listed as a 68 decal…
Weatherstripping does not fit properly or is not available anywhere:
A big pain in the a** is that most weatherstripping you can buy for a 1967 Eldorado does not fit properly, no matter who produces them. It looks very similar to the original gasket until you try to install it into the car, where you will find some differences, which make it impossible to install the gaskets easily. You will have to modify most of what you get. This is very frustrating and time consuming. There is no correct or fitting windowfelt kit available for you 67 Eldorado. Nobody is reproducing it! Take care of your original ones! Also some other gaskets are just not available anywhere.
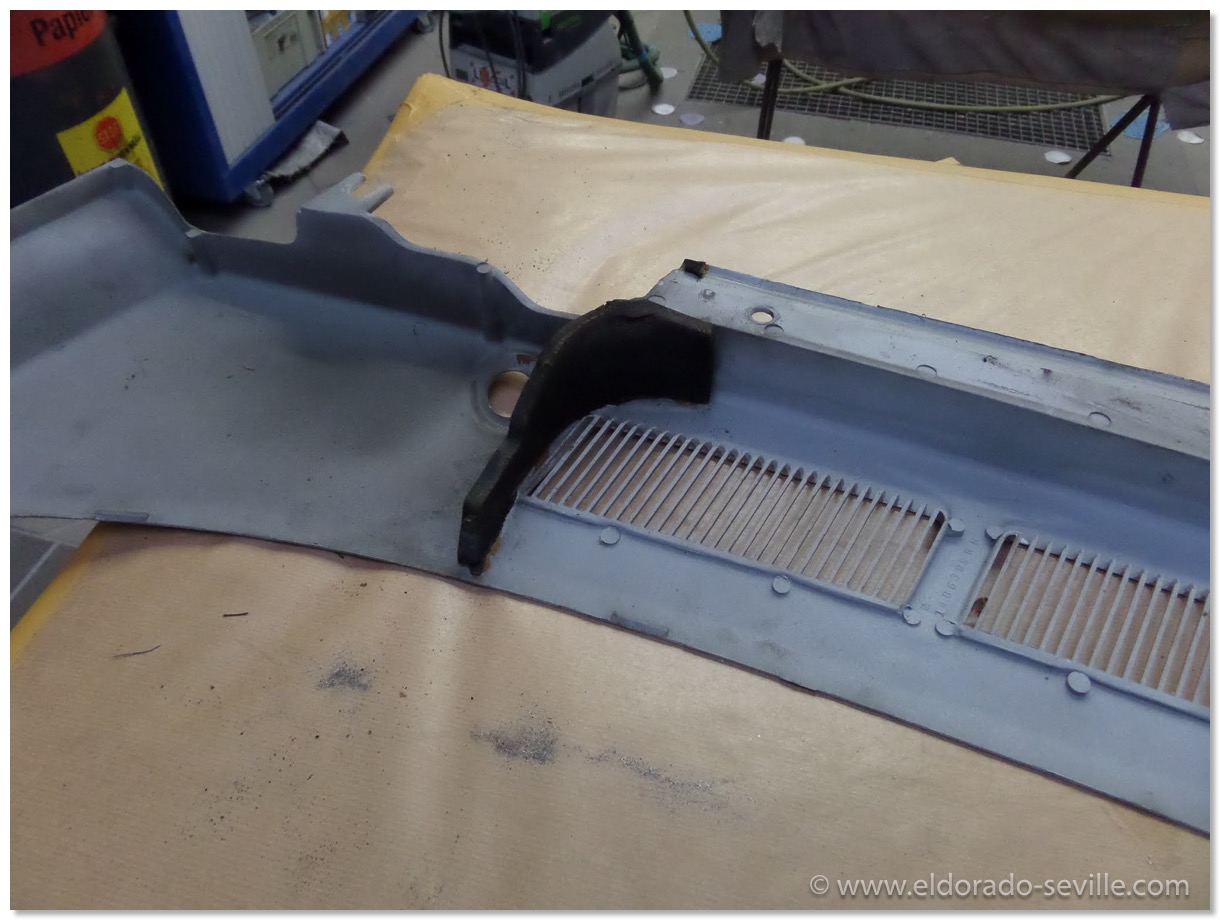
This cowl gasket is not available anywhere - you will have to reuse your old one…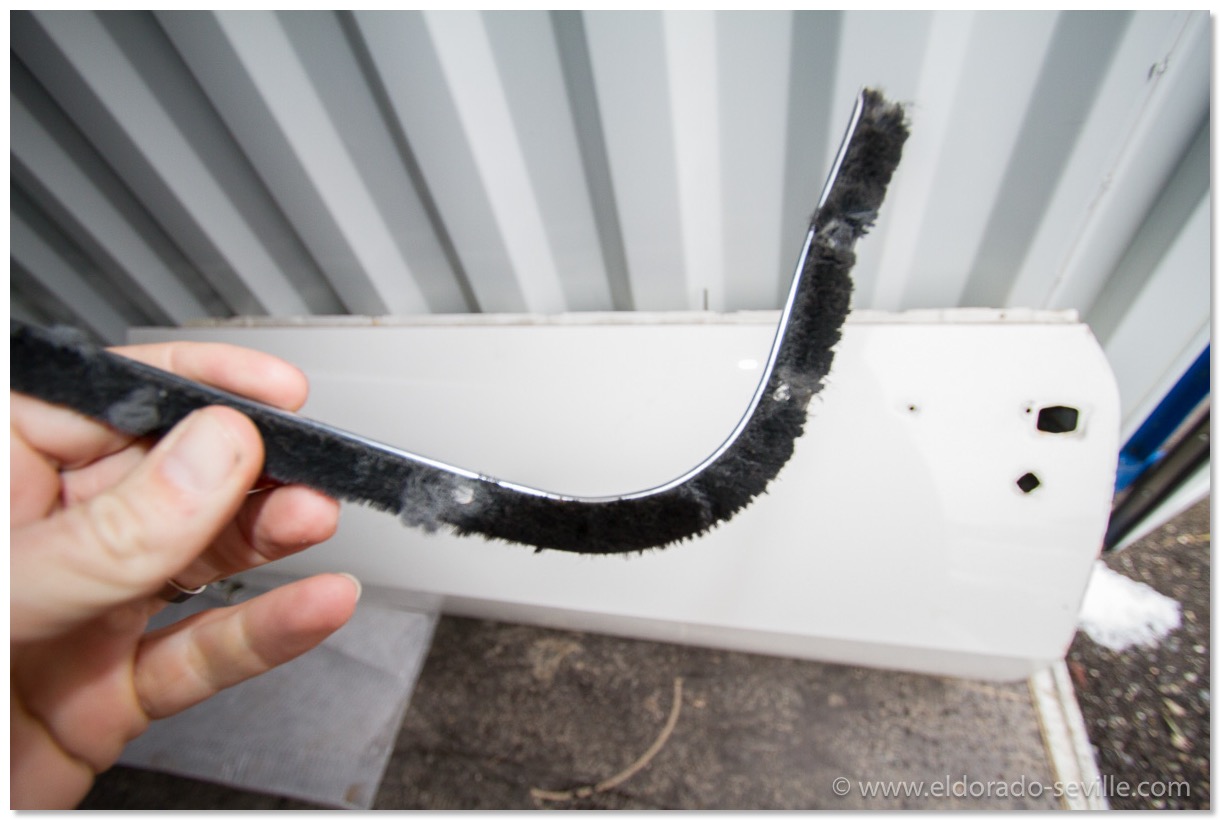
None of the sweep moldings and gaskets are available as a reproduction.
Rear rocker panel molding clips - the ones from a 1966 Pontiac GTO will fit perfectly:
To be able to properly re-paint the rear rocker panel extension on the 1967 Eldorado, you have to remove the stainless trim and remove all the molding clips, which you cant remove without destroying them unfortunately. If you look for ones for a 1967 Eldorado, you wont find any. So I had to do a lot of research and luckily found out that the ones from the 1966 Pontiac GTO are exactly the same ones as used on the 67 Eldorado. If you buy them make sure to order the installation tool too. Otherwise you cant install them properly.
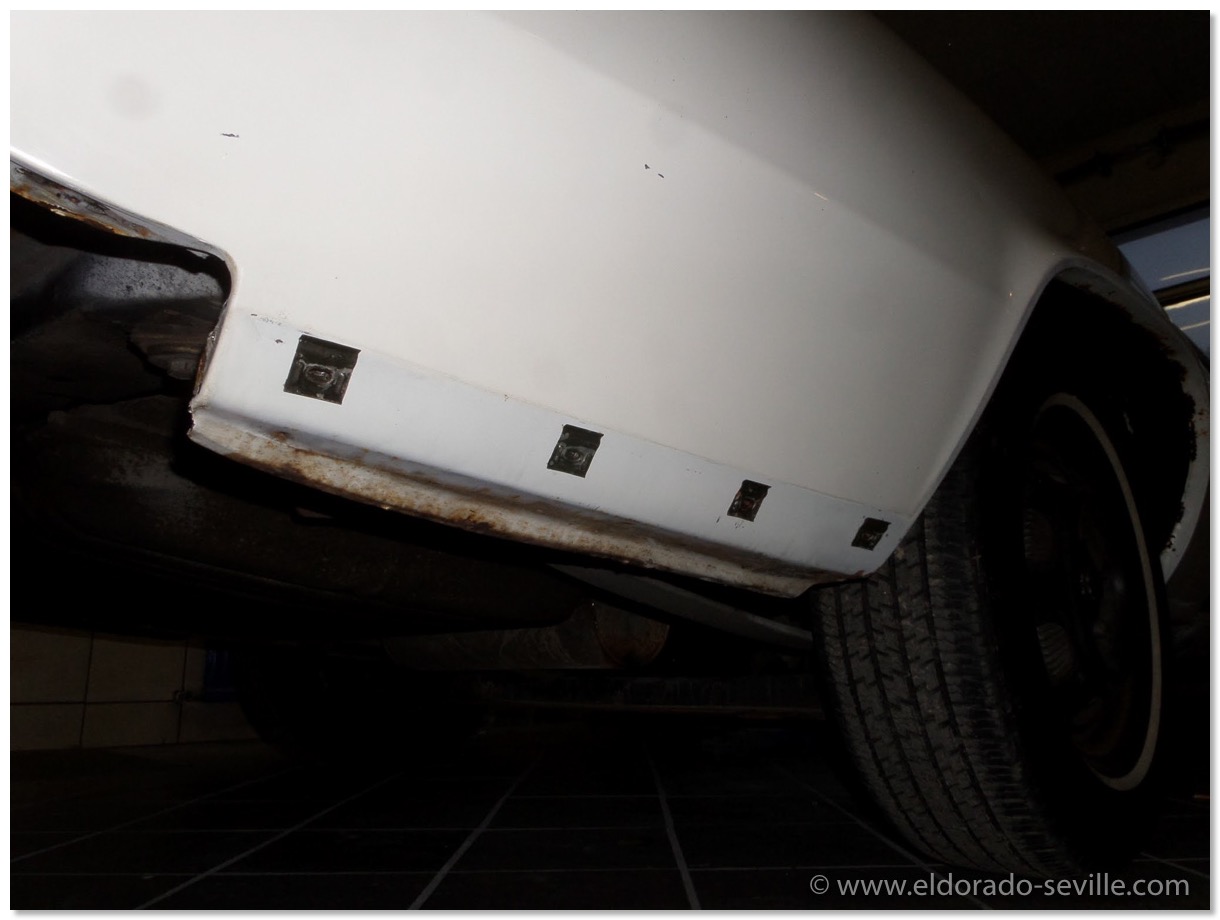
The clips before removal. You cant remove them without destroying them.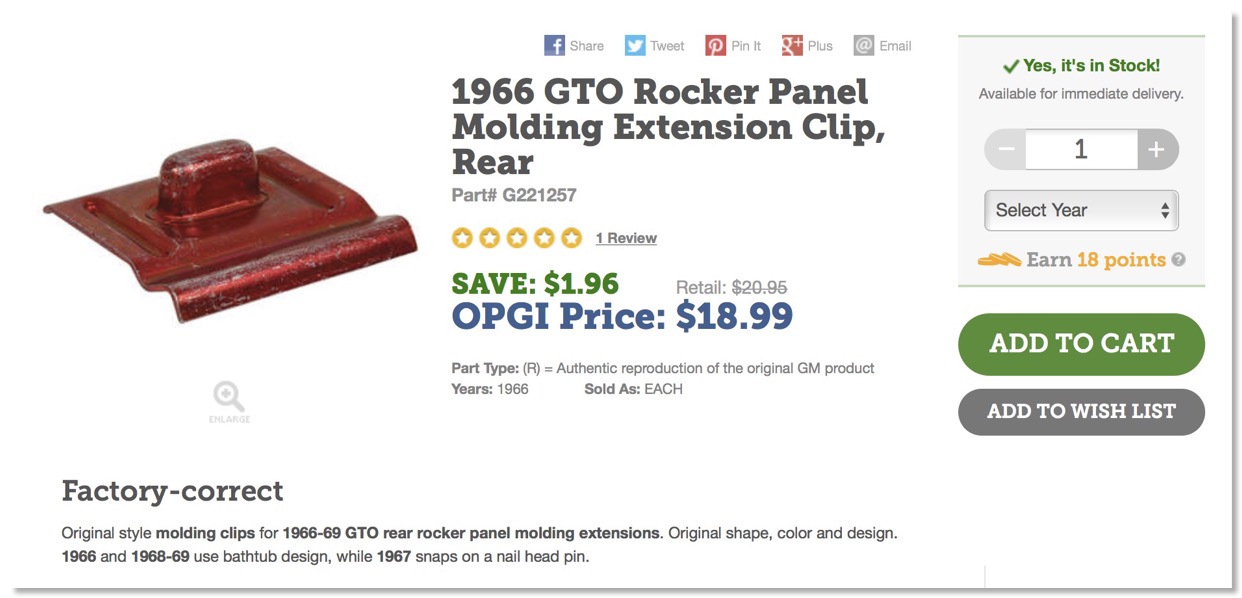
I bought 8 of these clips from OPGI - other sources have them as well, but they were the cheapest I could find.
Rear window trim moldings are hard to find and expensive for cars without a vinyl top:
The rear window trim on my car unfortunately had some rust through holes and my restoration shop said that they do not want to repair them. Especially the two small corner parts in the top corners of the rear window were beyond being repairable. I contacted all the usual Cadillac part vendors, but nobody had the smooth surface moldings available. 3 different moldings were used for the 1967 - 1970 Eldorados:
- Cars with vinyl tops had textured moldings matching the vinyl top in color and structure.
- Cars without a vinyl top had smooth surface moldings painted in the body color.
- Cars without a vinyl top delivered to Europe or California had polished stainless steel moldings.
Most Eldorados were ordered with the vinyl top and these moldings are more easily available and much cheaper. I found some smooth surface moldings on ebay but they were priced way too high for my taste… I was not willing to spend at least $2.000.- for them. (purchase price + shipping + import taxes).
So I talked to my restoration shop again and they said that I should at least get the corner pieces. If I got the ones from a vinyl top car they could remove the texture and make them smooth and repaint them.
Luckily I found these corner pieces in Switzerland for little money and the shop perfectly repaired the rest of the moldings. They do look perfect now! Fantastic job! If you need smooth moldings you can buy textured ones from a vinyl top car and just sand them smooth. They are identical otherwise.
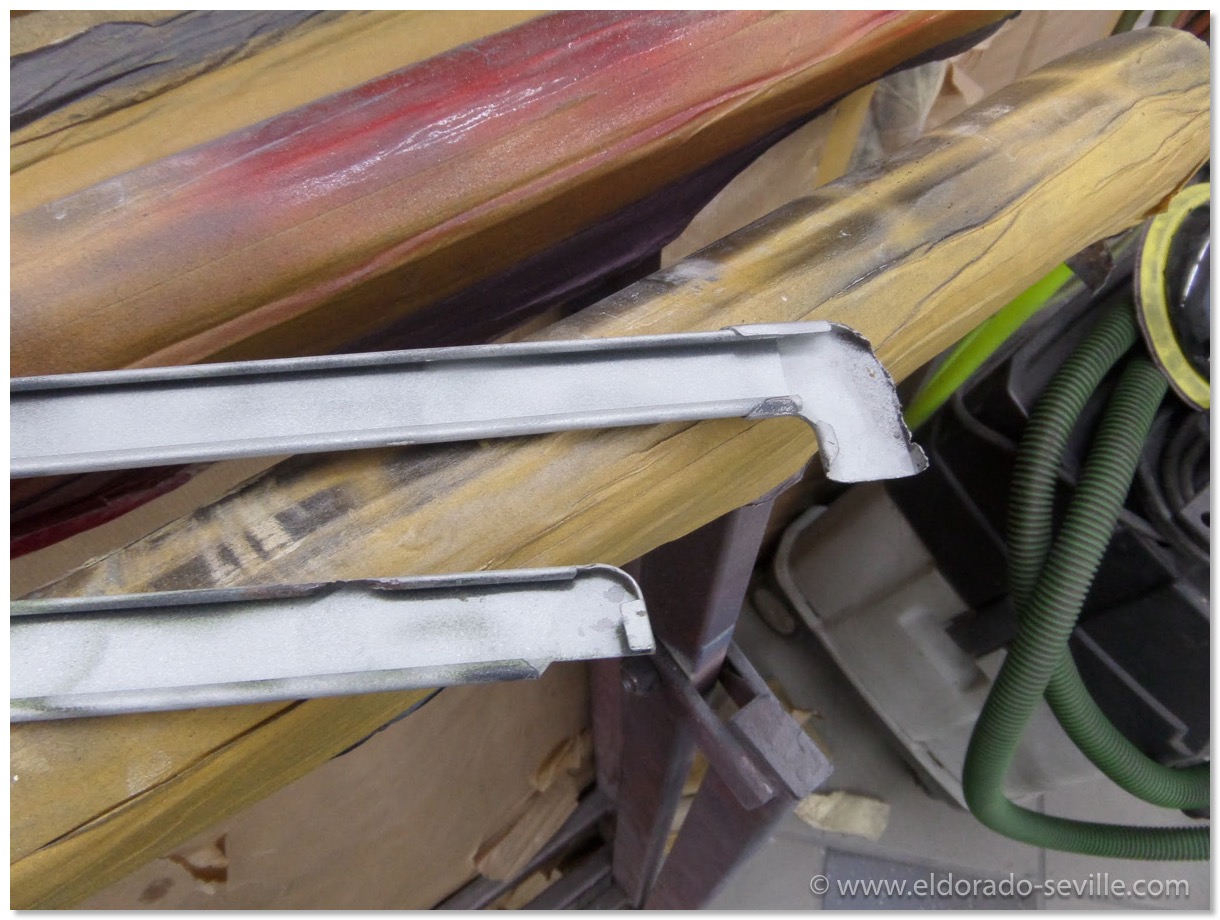
The moldings after sandblasting - they had some rust through areas unfortunately…
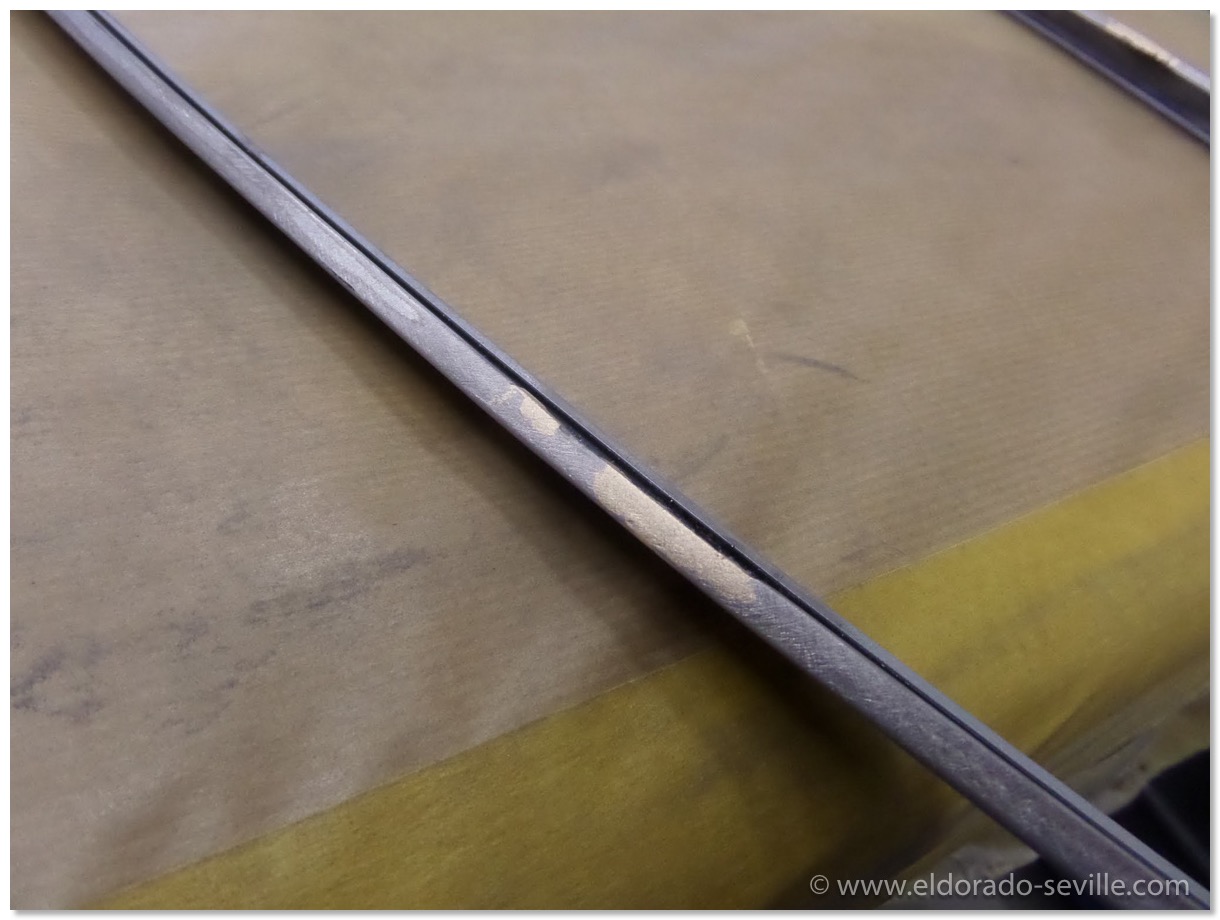
As we could not find any affordable replacement moldings the shop repaired the original ones - which is lots of work.
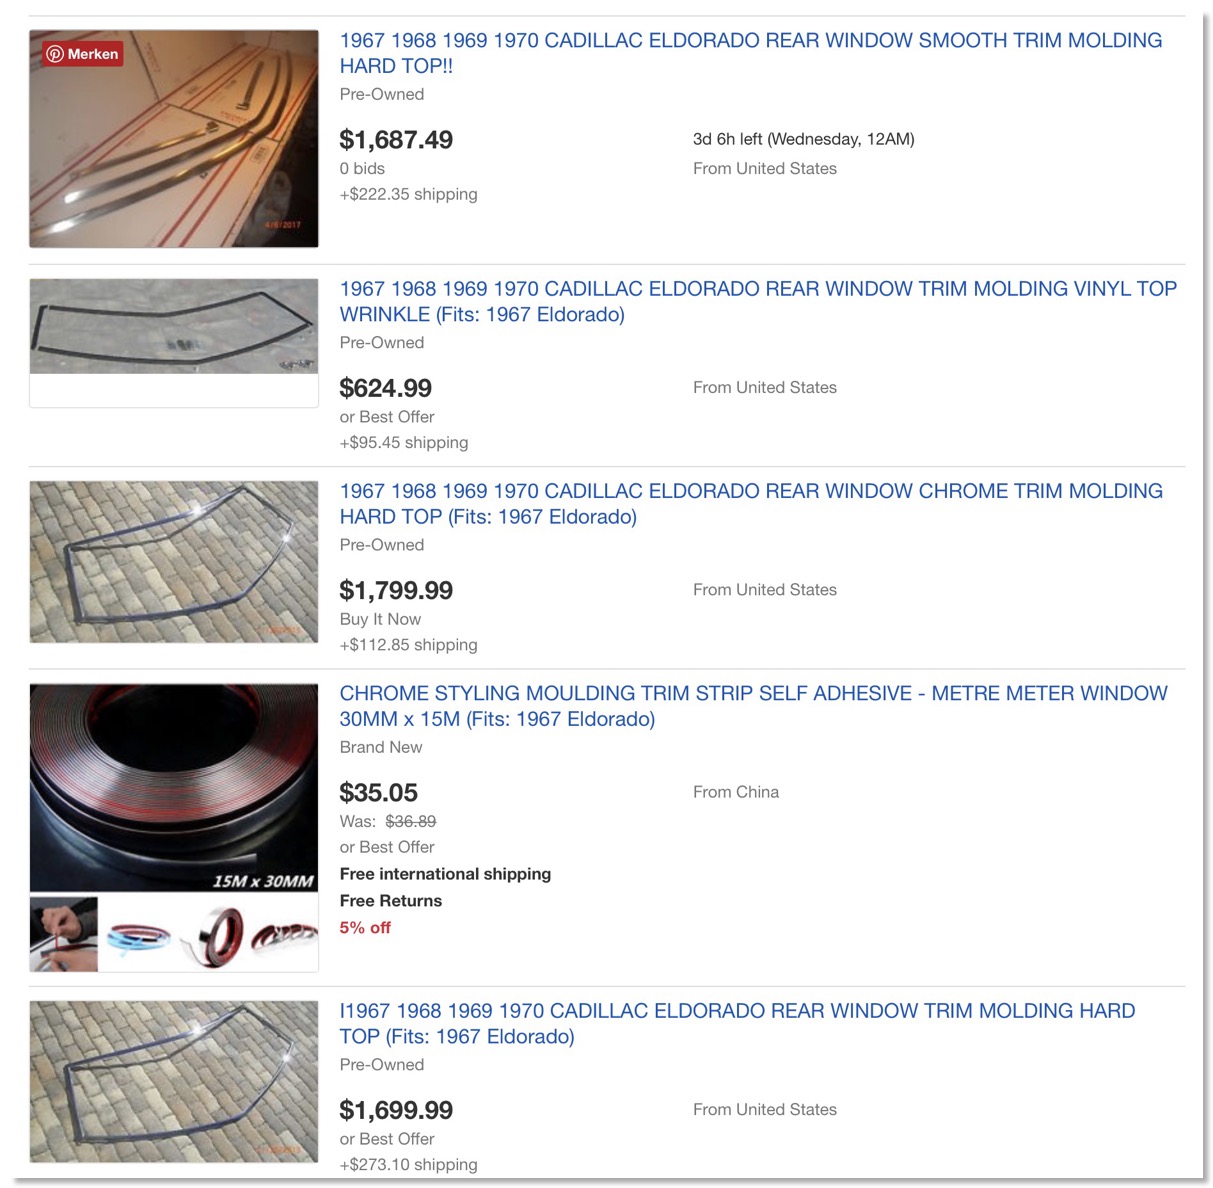
Ebay prices for used smooth rear window trim moldings. Crazy! Some sellers think they are made out of gold…
Factory sheet metal fit was terrible at the front fender covers and the taillight housings from the factory:
If you look at any 1967 Cadillac Eldorado, you can see that the front fender covers wont fit properly on any car. The designers did draw the fenders without these covers, but the factory could not mass produce a fender in this shape as one piece. Thats why on the 67 they settled to install a separate cover/filler as a compromise. Why they did not manage to produce a better fitting cover is beyond my knowledge. In 1968 they installed the turn signal lights instead of the fender cover.
My car was no exception from the ill fitting covers which my restoration shop did not want to accept. So they took the challenge and with some bodywork involved they made the pot metal fillers fit MUCH better. Some bending was involved, but you have to be extremely careful not to break the fragile pot metal covers.
The fit of the taillight housings also isn't very good and it has some gaps, which would be unacceptable by todays production standards. There is not much you can do to make the rear taillight housing fit perfectly - all you can do is try to adjust it a little bit during installation, but whatever you do there will still be some not so pretty gaps.
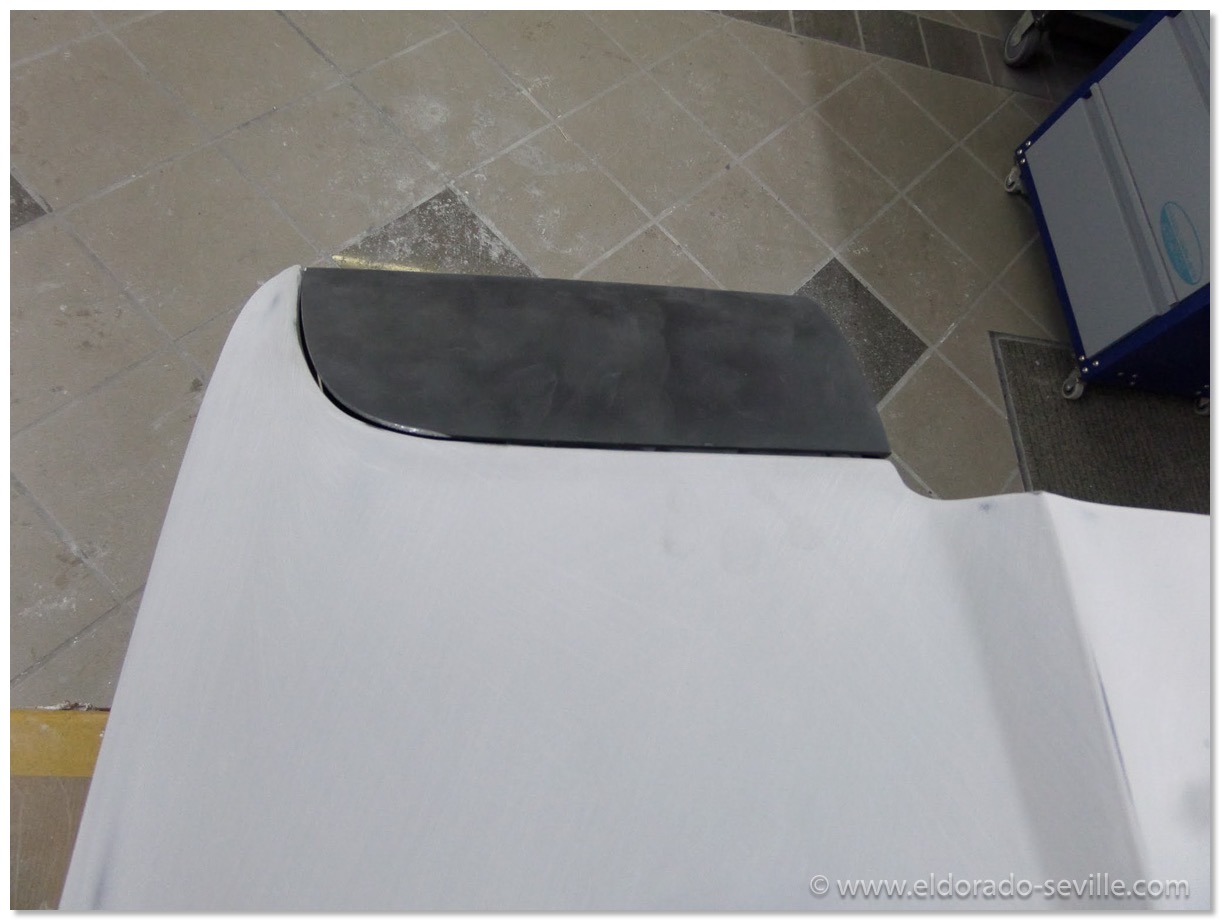
The front fender cover at the restoration shop - it will fit MUCH better now than it did when it left the factory.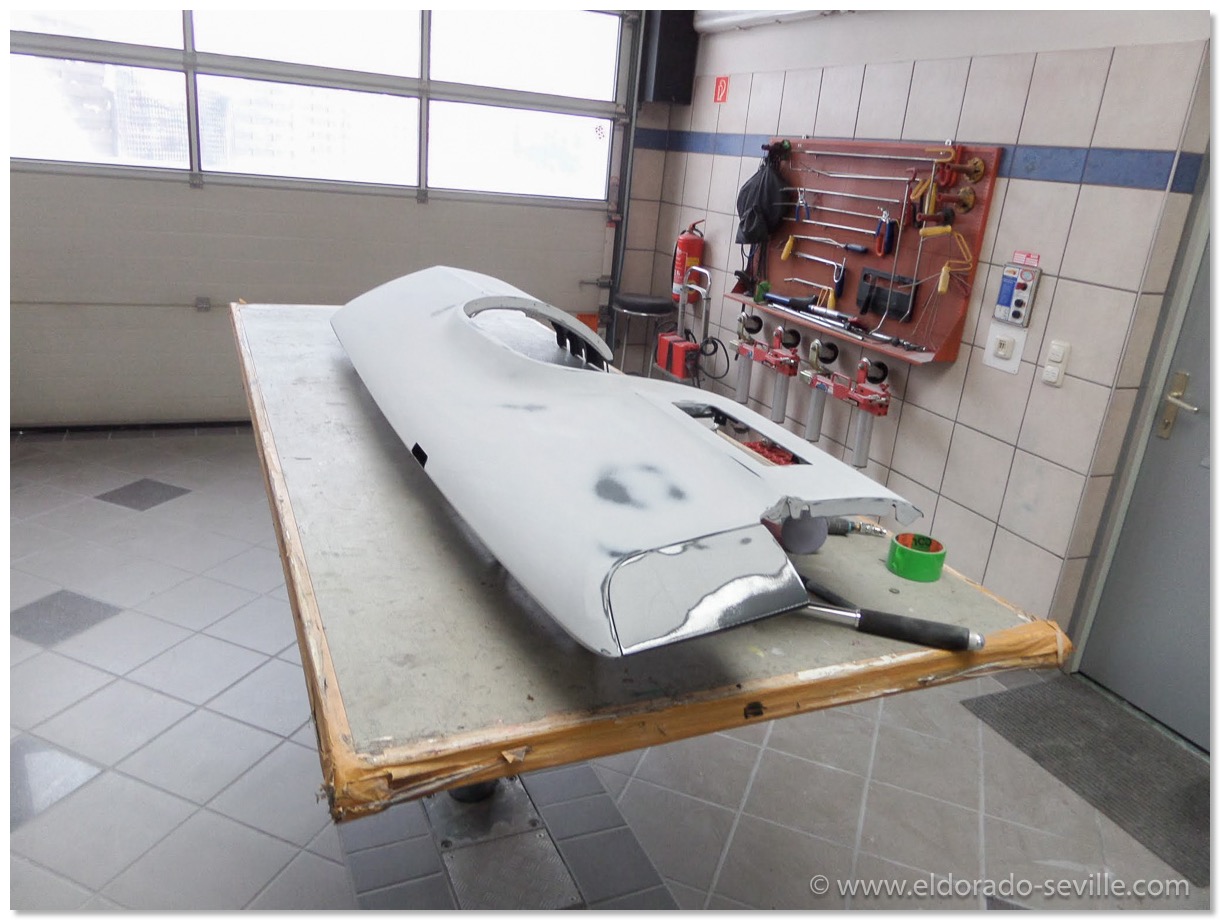
The front fender cover at the restoration shop - it will fit MUCH better now than it did when it left the factory.
Finding the correct color is difficult with todays paint:
Paint back in the days used different pigments, which are no longer available with modern paints. Thats why the old formulas have to be “translated" for the modern paints used today. My shop is using Autocolor (PPG) paints and they got the formula and the "Atlantis Blue Firemist" paint through PPG´s archive. Bernd - the shop owner - painted a sample with the paint they provided and compared it to the factory color sample we had from the "1967 Cadillac Exterior Color Selections Dealer Book" we had as a reference. It did not match very well… So Bernd changed the paints formula slightly and after 10 different samples painted, he found a perfect match for the 1967 Cadillac optional color "Atlantis Blue Firemist", which we then used to paint the car.
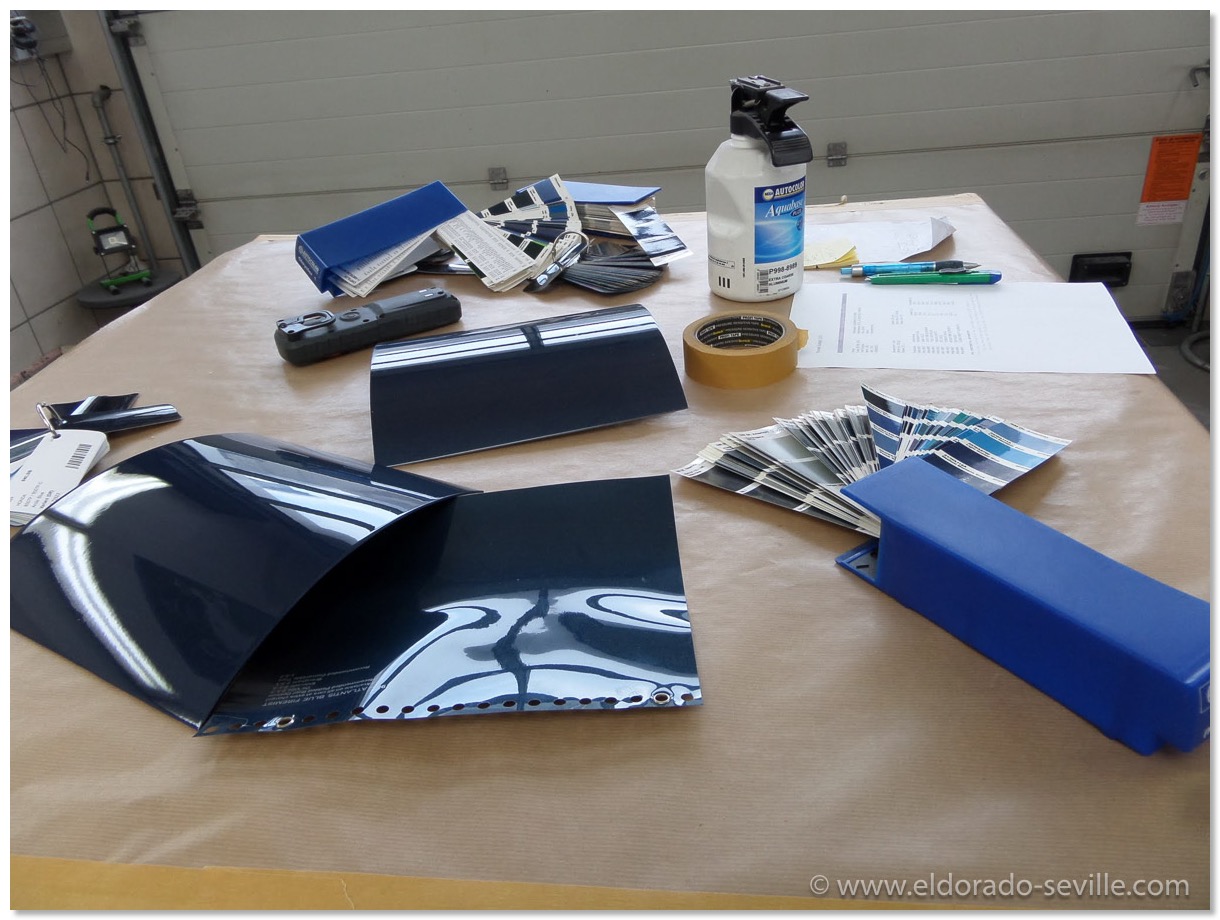
The shop had to mix and paint 10 samples until the color looked right.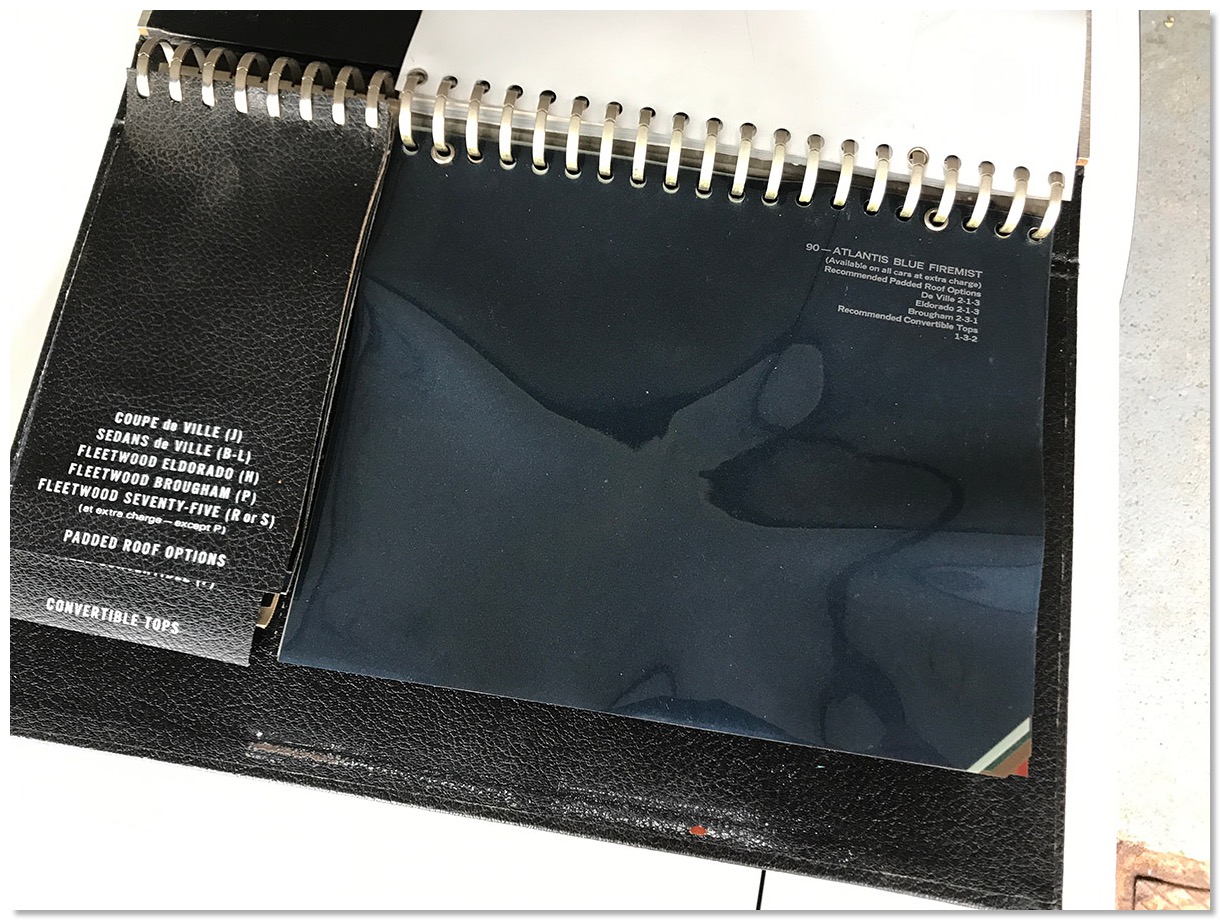
1967 Cadillac Exterior Color Selections Dealer Book
The hood is huge - and thats why most 1967 Eldorados have a light dent in the center of the hood:
If you sit on the steering wheel of an 1967/68 Eldorado and look at the hood and look very closely at the center of the huge hood you will most probably see a very light dent. At least it was there on all the 67/68 Eldorados I saw in real life so far. Most of the owners did not notice it. You can only see it from a certain angle. I now know why it is there. The hood is huge and will bend under its own weight. The center has a support brace to which the sheet metal is attached with glue/body sealer. Over the years this glue/sealer will shrink and the sheetmetal can flex more and will bend down slightly causing a light dent.
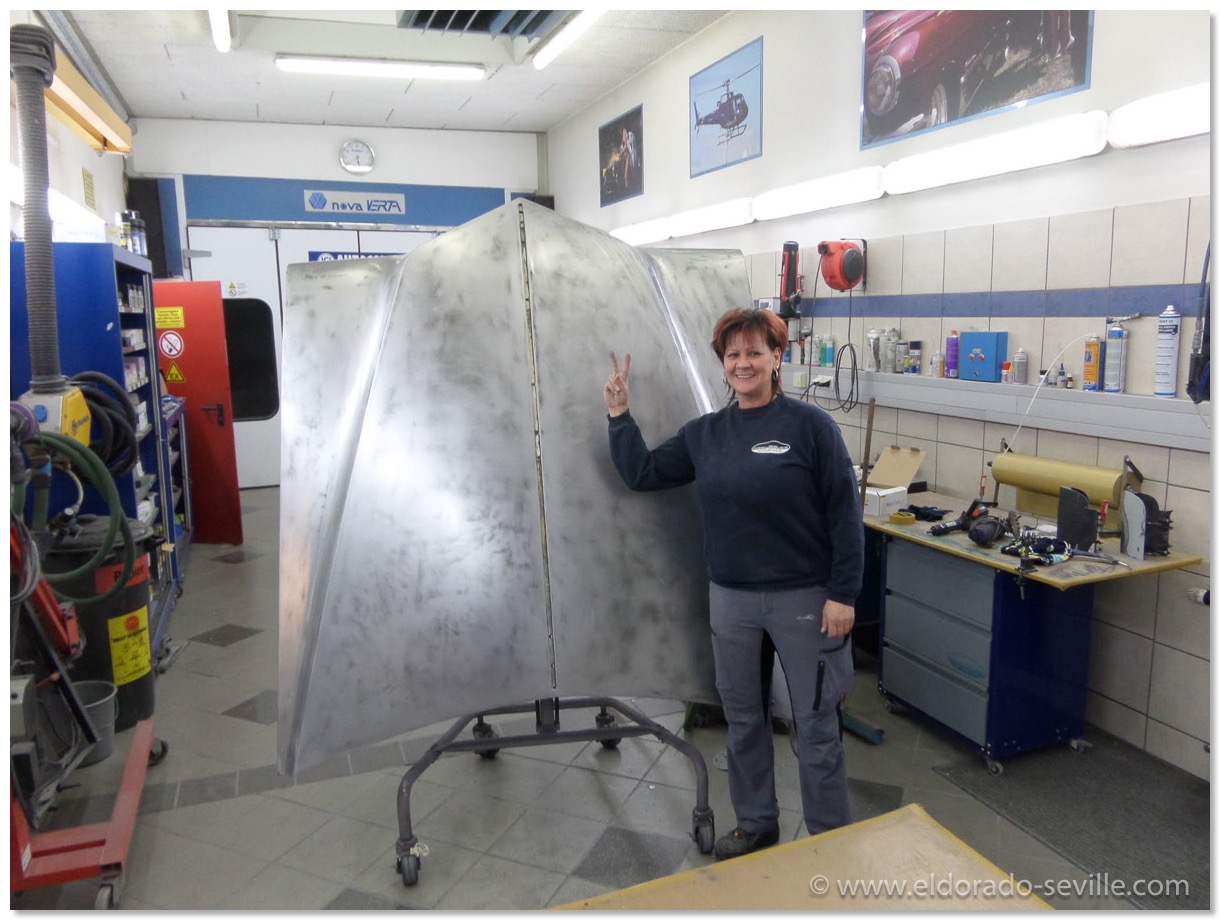
You can see how huge the hood really is.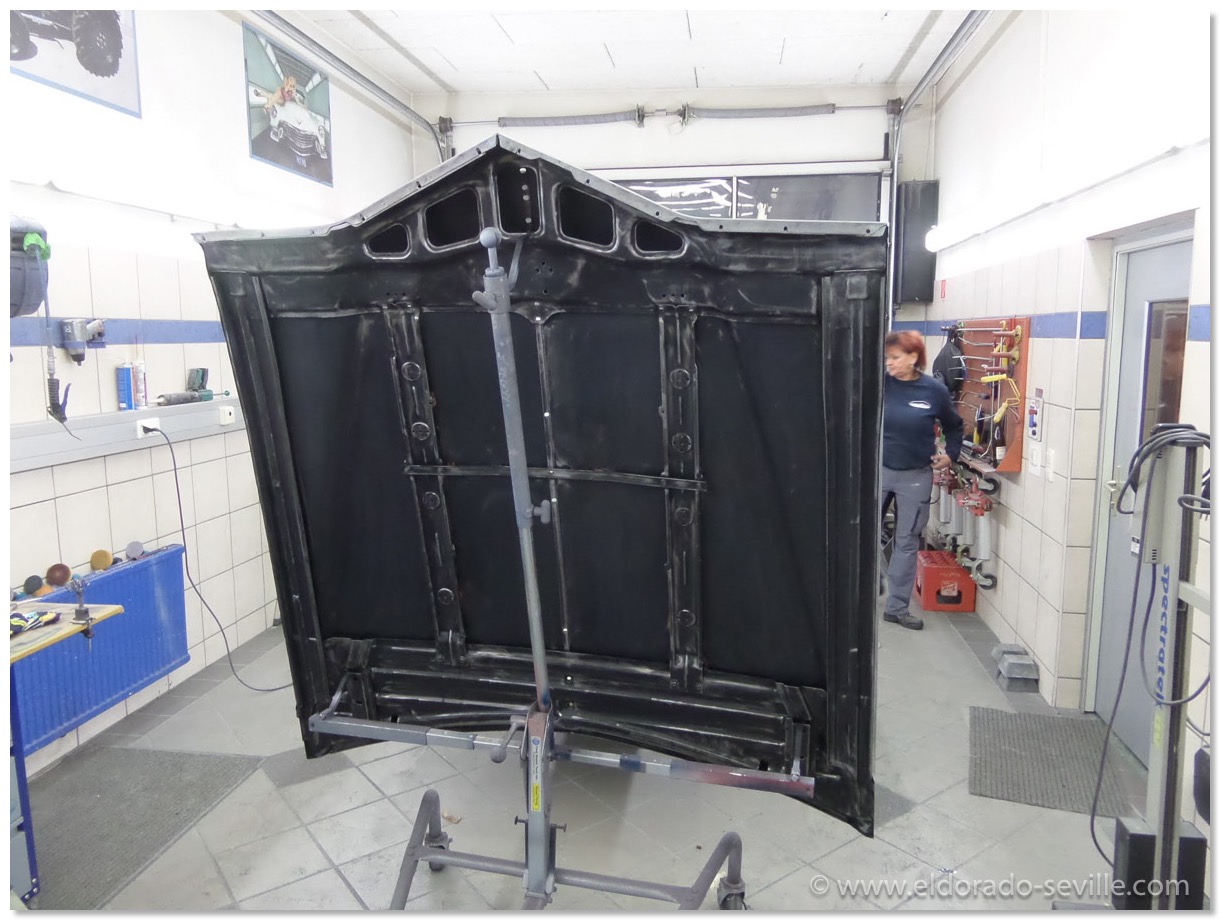
The center support brace is glued to the sheet metal and this glue shrinks over the years.
The cowl´s vents originally were painted silver:
Most restored/repainted 1967 Cadillac Eldorados have their vents at the cowl painted in body color. When these cars were new though, the vents were painted silver to look like the chrome vents, which were used on the regular Cadillac models in 1967. On the "regular" 67 Cadillacs the vents were a separate chromed piece attached to the cowl, whereas on the Eldorado the vents are integrated into the cowl. This silver paint was just sprayed over the body color - probably by using a stencil and it did often wear or flake off over the years. My car was still completely untouched, and had about 80% of its original silver paint at the vents still intact. At this restoration we reproduced what Cadillac did at the factory, and painted them silver again. It's an extra step, but these little details make a huge difference for me when it comes to authenticity.
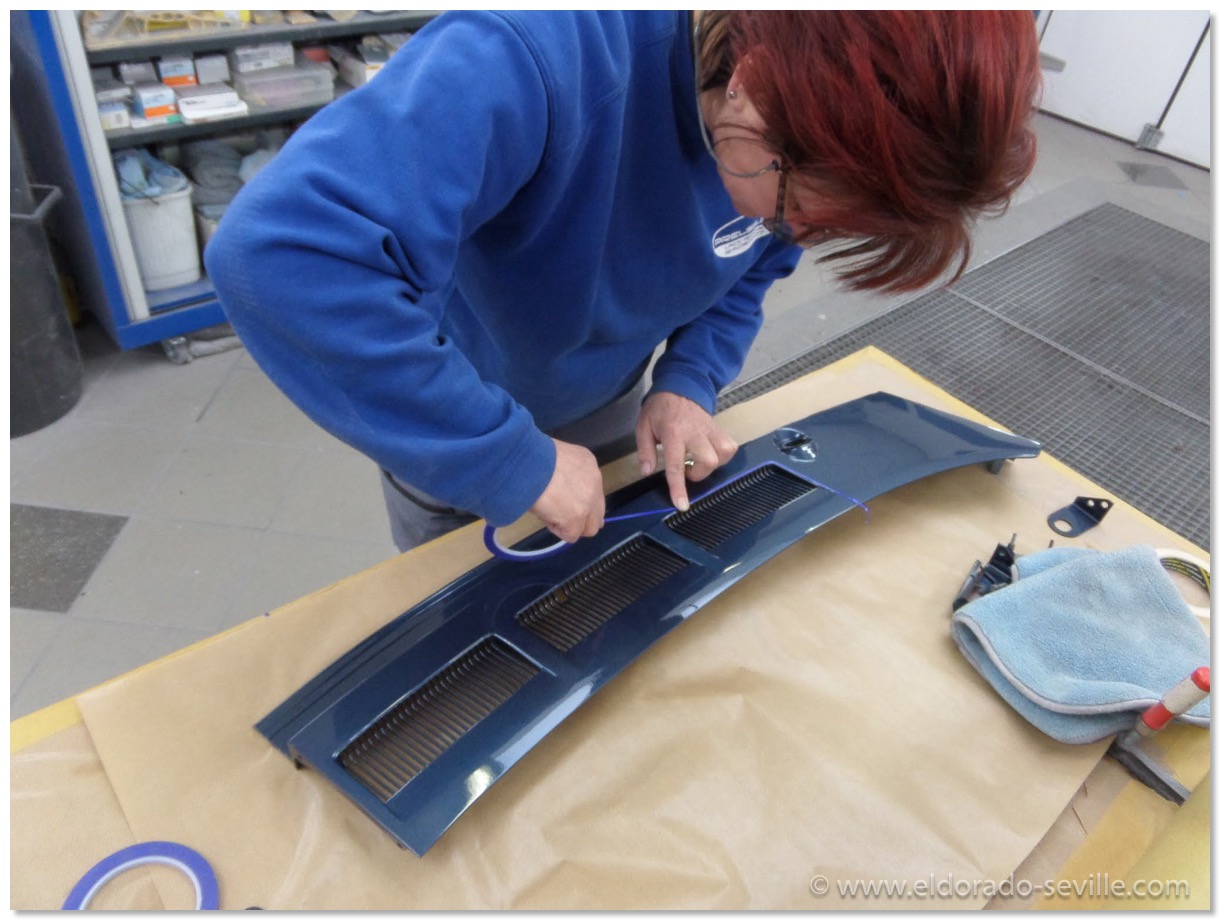
Angela masking off the vents.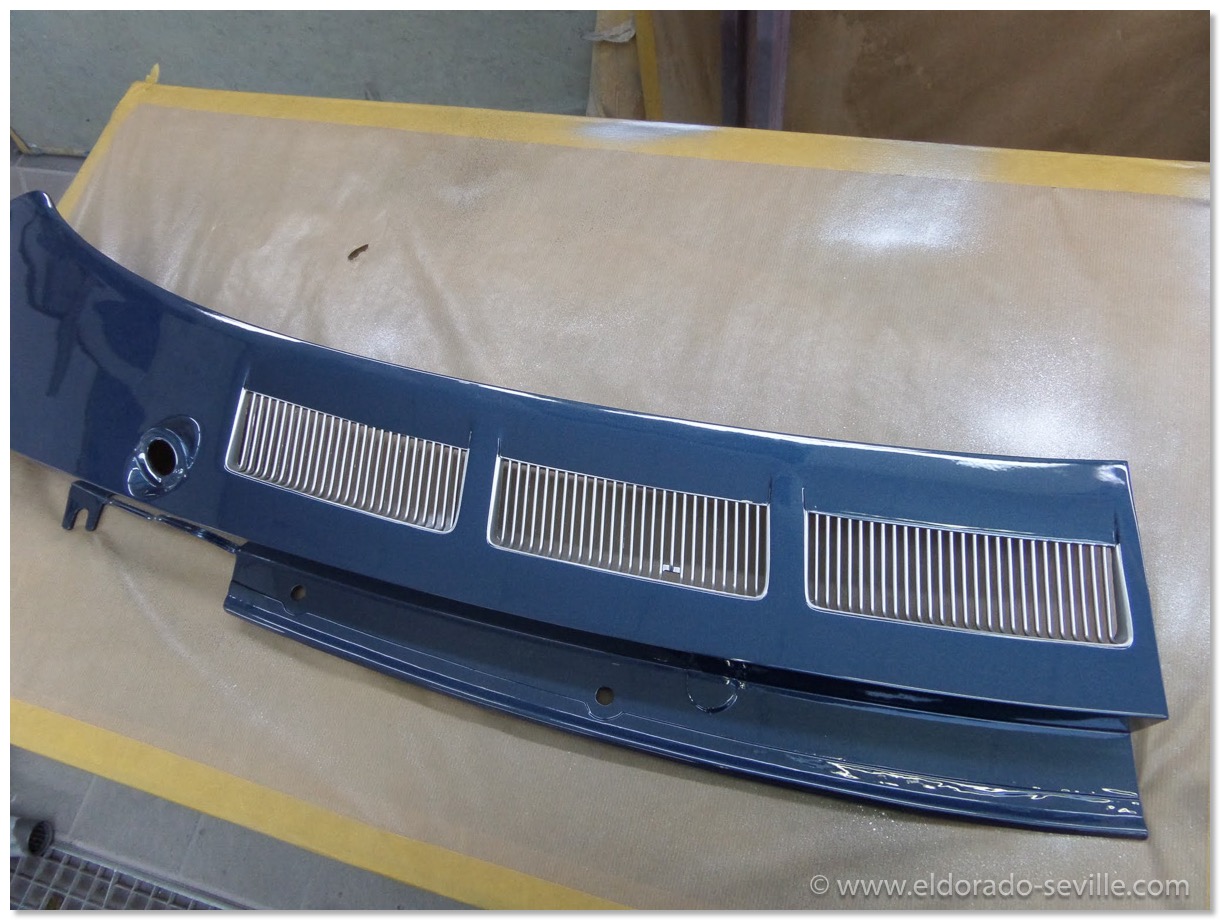
After painting the vents silver.
Replacement trunk cardboard kits come in the wrong color:
All trunk cardboard kits you can buy will come as a flat black cardboard. The original material was more greyish with a pattern on it. So the flat black cardboard looks completely incorrect. Luckily Bernd came up with the idea to reproduce the original look by painting the boards. He did an awesome job matching the original look of the cardboard.
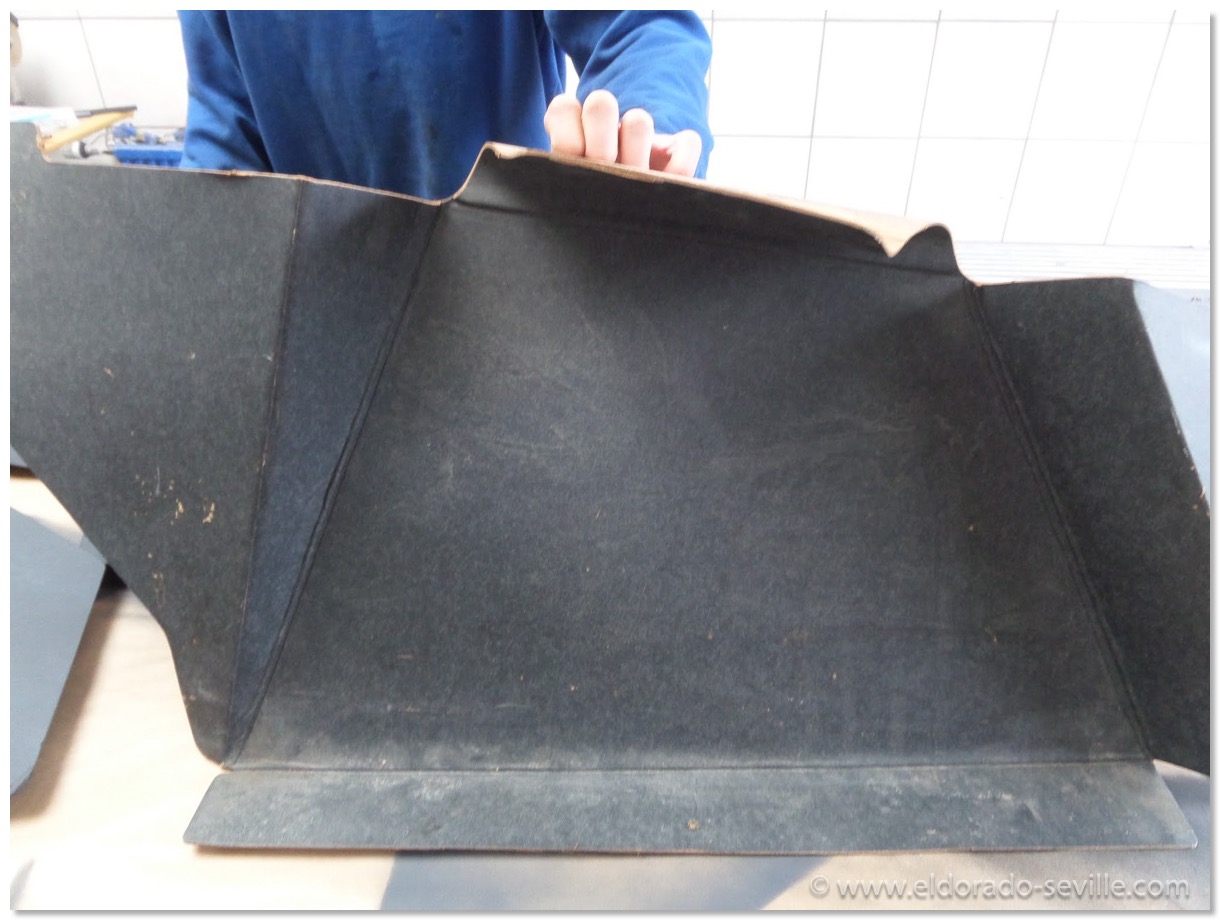
This is how the original trunk cardboard looked like.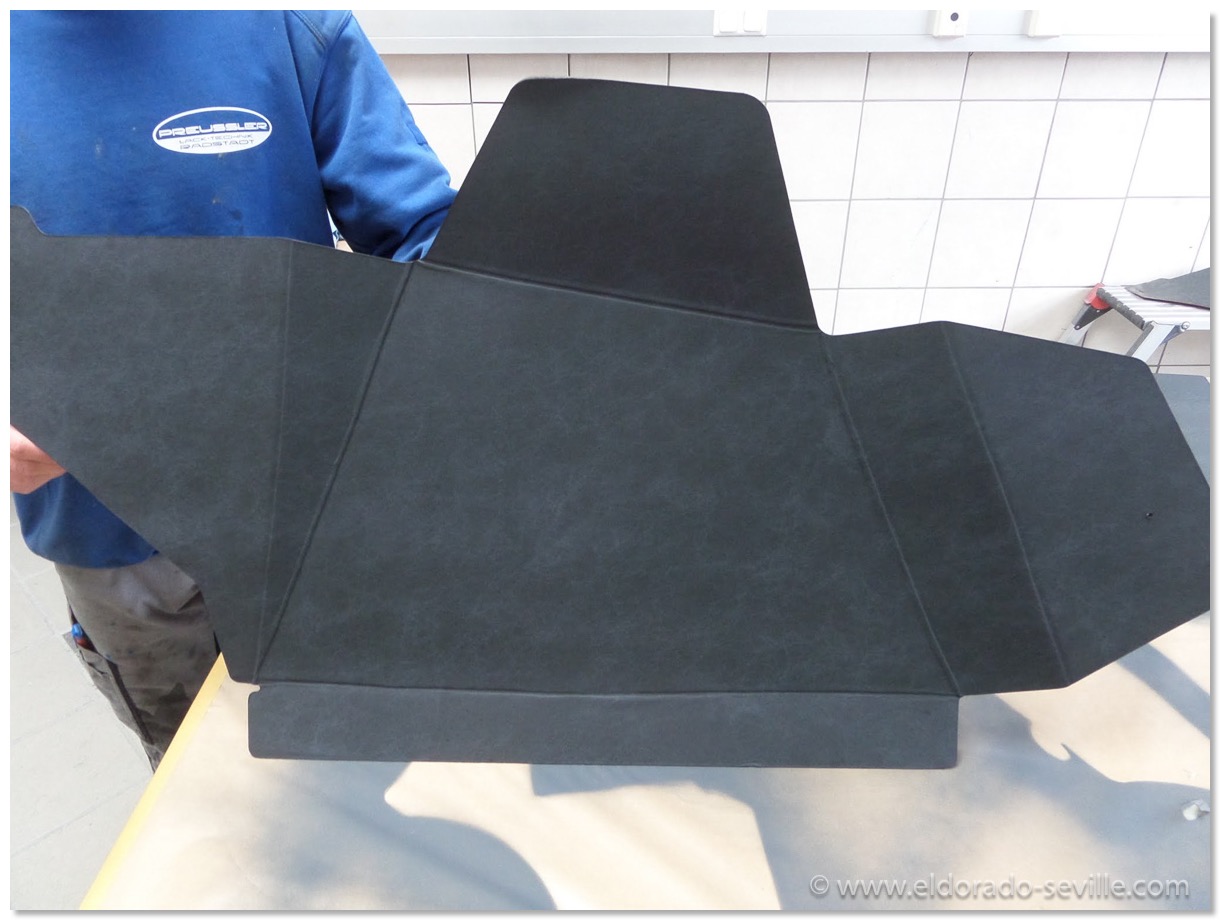
Bernd and Angela managed to paint the flat black reproduction cardboard to look like the original one again.
Replacement carpets do not fit without a lot of trimming:
When you buy a pre-cut carpet you might think that you just have to install it. Unfortunately it's not that easy… You will still have to do a LOT of cutting and trimming to make it fit. Very annoying and time consuming work…
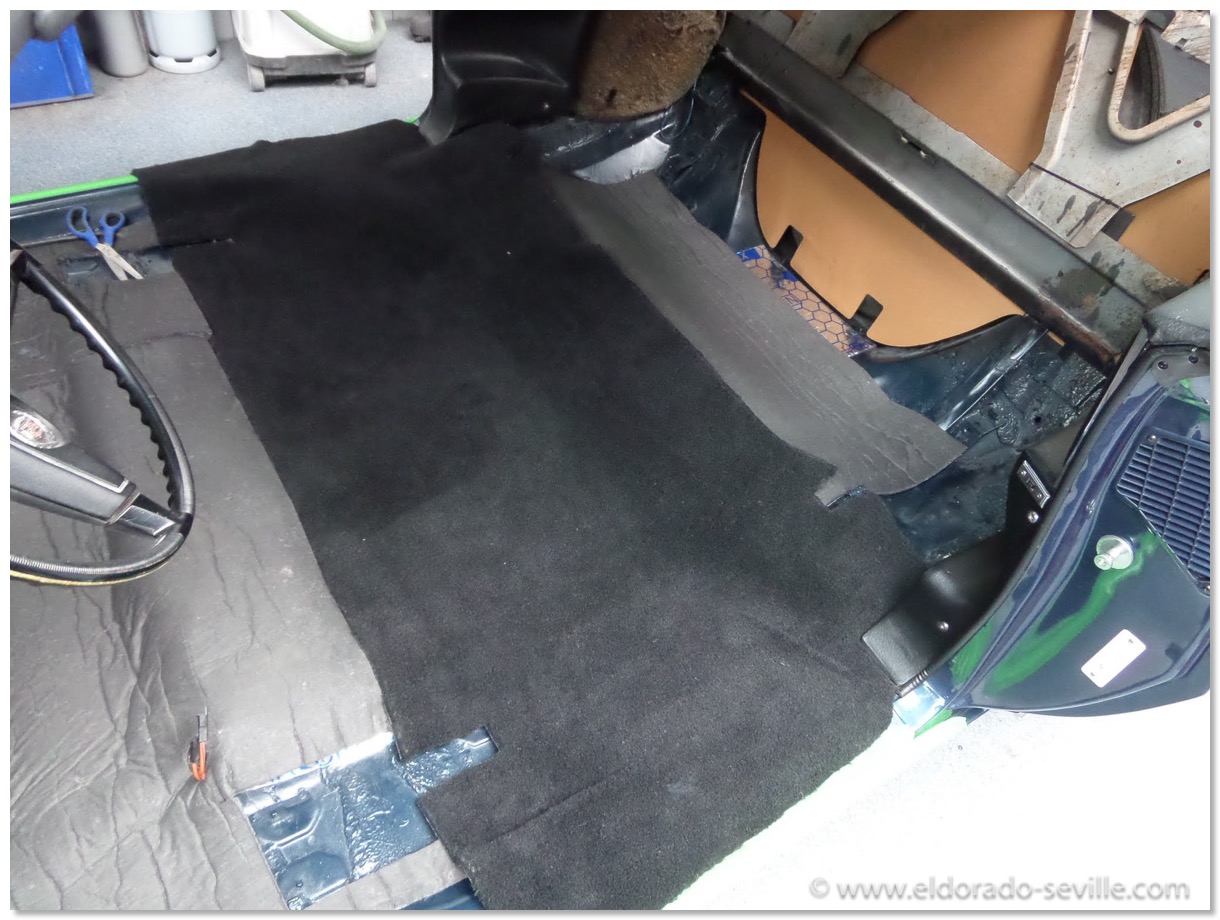
Even precut carpets will need a lot of trimming and cutting to fit.
Trunk to bumper cover is not available:
Take good care of your original trunk to bumper cover. Its made of a certain plastic and tends to break in some areas. Mine had a few tears and was broken. The shop is fixing it up now with epoxy and will sand it down and repaint it. Its lot of work that has to be done as replacements are not available. I could not even find a good used one.
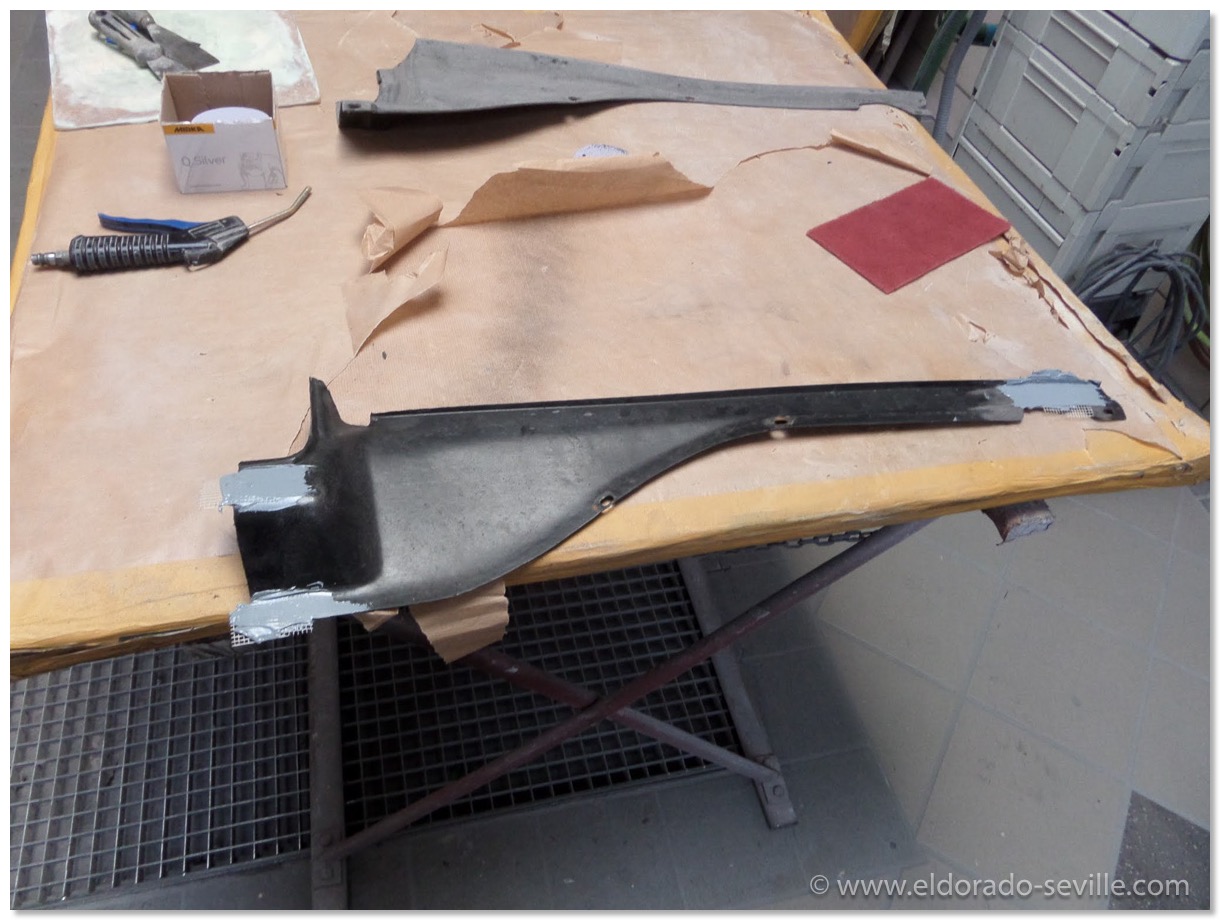
The trunk to bumper cover during fixing it up
Change the color of the car or not? Or just leave it original with some patina?:
I had a very hard time when it came to decide if I should change the original color of the car from "Grecian White" to "Atlantis Blue Firemist".
Of course its always a matter of personal taste which color one likes best. Normally I'm an extreme purist when it comes to the topic of how a car should be painted, and generally I always prefer a car in the color it left the factory. I never understood how anyone could change the color of a car during a restoration. I discussed this topic with friends and fellow Cadillac owners for months. Most said that I should change the color to a color I like.
"Grecian White" is a very neutral and elegant color, but for me personally it was the least attractive color Cadillac had to offer in 1967. My favorite colors for the 1967 Eldorado are "Atlantis Blue Firemist" and "Doeskin". My 1967 DeVille is painted in "Doeskin" (Code 44), so I did not want another car in this color. When the restoration started, I still was not sure which color I would choose, but I had a very strong tendency to paint it in its original white color again…
The turning point was when I first saw the car in bare metal. All the original white paint was removed for the repaint. There were no traces of the original paint left anywhere. Somehow it was sad to see all the original paint gone. The car felt completely different, and I had the feeling that I extinguished the cars history and that I should not have started a restoration at all. But when I saw all the damage around the front and rear windows and the pictures of the chipped paint, I realised that it really was time to save the car, and that the repaint was not just a cosmetic improvement.
Some people suggested to just keep the car completely original and live with the patina. I do not have a problem with patina as long as it wont affect the cars "health" and the bodies rigidity with rust holes. On my car it was time to act though… Some areas were already too much damaged to just leave them alone. The few people I showed my car prior to the restoration never noticed the cars fantastic interior, the straight body, or the technical condition, or how fabulously it drove, but always pointed out the rust around the rear window and the poor repair attempts of a previous owner. Thats why I never showed the car anywhere. Everyone looked down at the car due to its obvious flaws it had and nobody noticed all the positive things this car had to offer.
When I saw the car "naked" in the restoration shop after all the paint was stripped, I suddenly did no longer see the point of keeping the cars original color. Even if I would paint it white again, it would no longer be original with its modern paint. If I would paint it in a color I like more, it would also no longer be an original car, but at least I would enjoy looking at the car much more. At this turning point I decided to have it painted Atlantis Blue Firemist… I´m sure that there will be times where I will look at old pictures and regret my decision, but most of the time I will enjoy its fantastic new color.
The CLC (Cadillac LaSalle Club) will not deduct any points for a color change when the car is judged, as long as you change the color to a correct factory color of its model year…
The moral of this story: If the car originally would have had any other color than white I would not have changed the color. If certain areas would not have been too much gone I would have left the car completely original and have lived with some patina, but enjoyed an all original car…
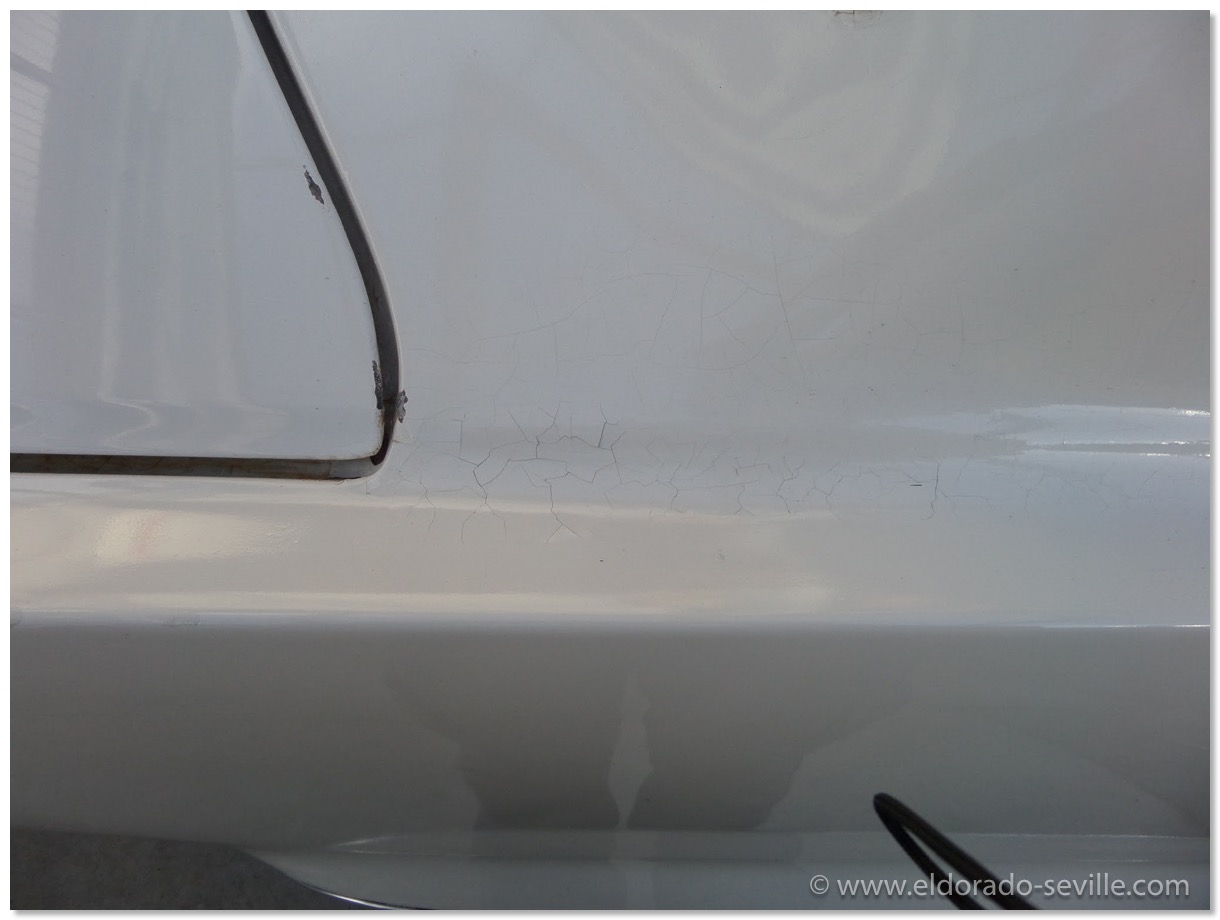
One of the many reasons why there was no way around a repaint of the car.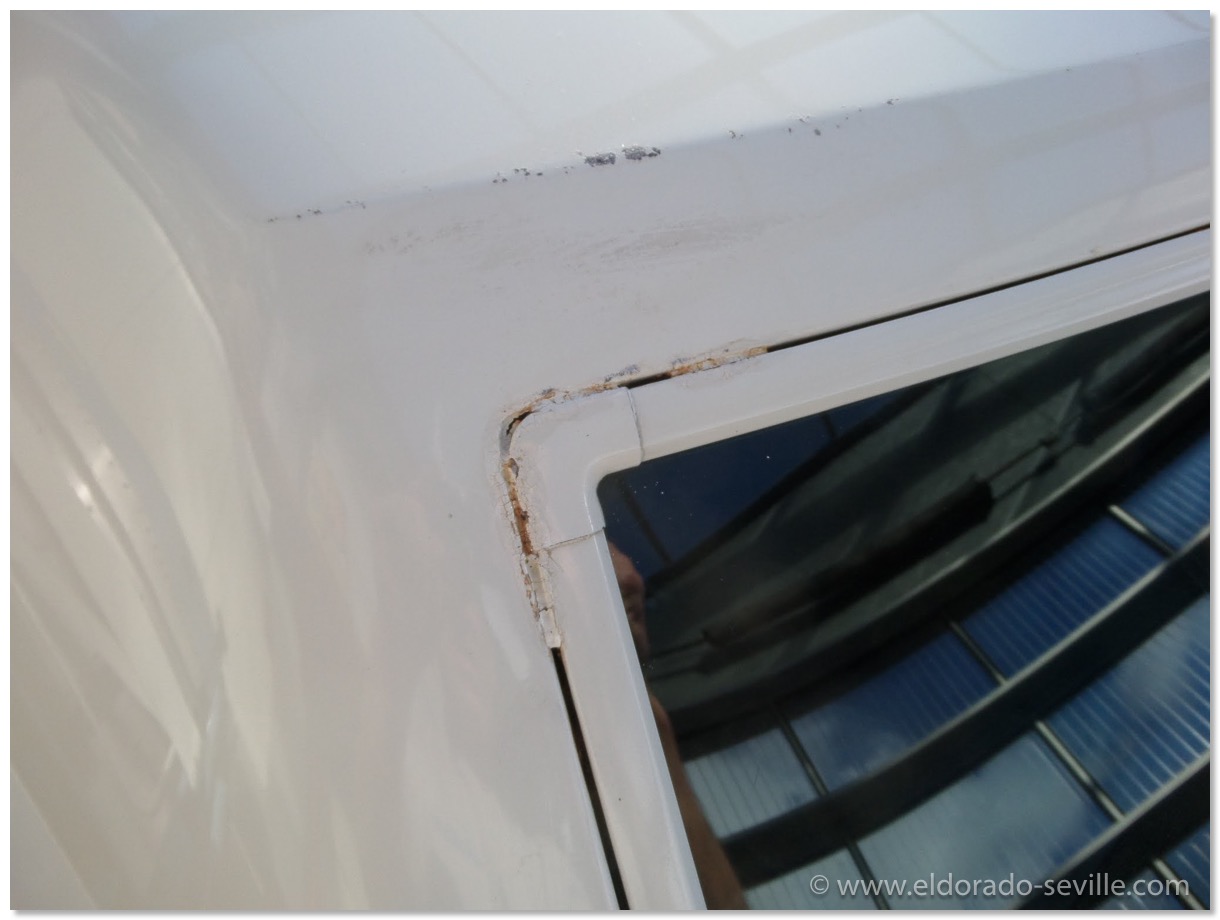
One of the many reasons why there was no way around a repaint of the car.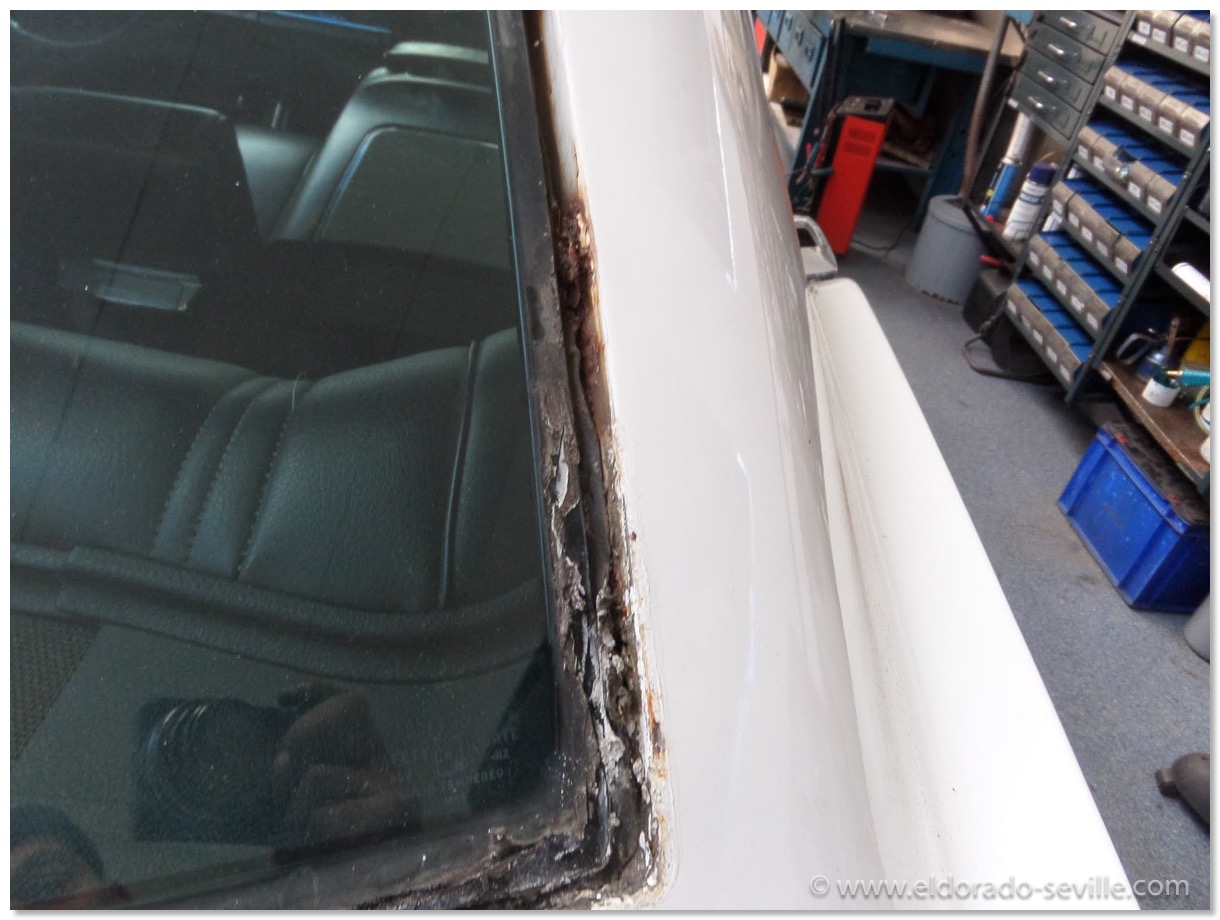
Unfortunately the area around the rear window had some rust holes which had to be repaired. No way to just leave it that way.
1966 Cadillac Coupe deVille (16)
1967 Cadillac DeVille (54)
1967 Cadillac Eldorado (73)
1971 Lincoln Continental Mark III (24)
1974 Cadillac Coupe deVille (46)
1978 Cadillac Eldorado Biarritz (25)
1996 Buick Roadmaster (20)
Cadillac BIG Meet (2)
Car Shows (55)
Cruising (4)
CT6 (1)
For Sale (3)
Garage Stuff (32)
Pacer (1)
Restoration (140)
Various (55)
Video (20)
Website News (31)
- 6 way power seat
- 8-track
- 10 Ohm
- 429
- 1932
- 1957
- 1958
- 1958 Cadillac Eldorado Seville
- 1958 Cadillac Repair Tip
- 1959 Cadillac Eldorado Seville
- 1964
- 1965
- 1966
- 1966 Cadillac Coupe deVille
- 1966 Cadillac Repair Tips
- 1967
- 1967 Cadillac DeVille
- 1967 Cadillac Eldorado Repair Tip
- 1967 Cadillac Repair Tip
- 1967 Eldorado
- 1968
- 1970 Cadillac Eldorado
- 1971
- 1971 Lincoln Continental Mark III
- 1974
- 1974 Cadillac Coupe DeVille
- 1974 Cadillac Repair Tip
- 1976
- 1977
- 1978
- 1978 Cadillac Eldorado Biarritz
- 1978 Cadillac Repair Tip
- 1980 Cadillac Eldorado Biarritz
- 1996
- 2012
- 2014
- 2017
- 2018
- 2019
- 2022
- 2023
- 2025
- 3063206
- 7027235
- 7800483
- 7805675
- 7805676
- 12355706
- 17058531
- 17059968
- 17059969
- 22010515
- 22010661
- A.I.R
- A6
- AC
- AC Compressor
- AC Electrical Diagram
- ACC
- Accelerator Pump
- Accelorator pump
- Accident
- Actuators
- Adriatic Blue Metallic
- Ads
- Aftermovie
- Air Pump
- Aircondition
- AIRPUMP
- ALC
- Alternator
- AM
- AM-Transmitter
- Antenna
- Anti Rattle Clips
- Antique Gold
- Arizona Vintage Parts
- Arrival
- Article
- ASC
- Ash Tray removal
- ATC
- Atlantis Blue Firemist
- Austria
- Austro Classic
- Autolite SP-459
- Automatic Seat Back Release
- Award
- Banner
- Barn Find
- Battery
- Battery Tray
- Beach Race
- Bearing
- Bendix
- Biarritz
- Bigfoot
- Bill Hirsch Engine Enamel
- Bleeder Screws
- Bleeding
- Blower
- Bodywork
- Bolts
- Book
- Borg
- Brake Booster
- Brake Fluid
- Brake Gray
- Brakes
- Broken Bolt
- Brougham
- Bucket seats
- Buick
- Bumper End
- Bushings
- Cadillac
- Cadillac BIG Meet
- Cadillac BIG Meet
- Cadillac birthday cake
- Cadillac Blue
- Cadillac Color Selections Dealer Book
- Cadillac Coupe deVille
- Cadillac Dealer
- CADILLAC GRAND EUROPEAN
- Cadillac Meeting
- Cadillac Mini Meeting
- Camaro RS
- Caorle
- Car Show
- Carburetor
- Card
- Carpet
- Carter AFB
- Cavalry Twill Vinyl
- CB
- CBM
- CCCD
- Choke
- Christmas
- Citizens Band
- Classic Cadillac Club Deutschland
- Clay Towel
- Cleaning
- Clock
- Clockwork
- Clutch
- Clutch Coil
- Collector
- Colonial Yellow
- Color Coded Springs
- Commercial
- Compound
- Compressor
- Condenser
- Continental Mark III
- Control Head
- Conversion
- Convertible top
- Coolant
- Corona
- Cowl
- Cruise Control
- Cruising
- CT6
- CV Boots
- CV JOINTS
- D6230
- Dash Trim
- Decal Removal
- Decals
- Decoration
- Dehumidifier
- Delco Moraine
- Der Standard
- detailing
- Deville
- Diagnosis Chart
- Diagram
- Dial
- Digital Rotary Drum Clock
- Diner
- Disc Brakes
- Distributor
- Diverter Valve
- Door Jamb Switch
- Door Rubber Conduit
- Dornbirn
- Dot3
- Drive Shaft
- Driving tour
- Drum brakes
- Dry Ice Blasting
- Dry Ice Cleaning
- DVD
- Eastwood
- Eldorado
- Electric Choke Thermostat
- Electrical schematic
- Elvis
- Engine Bay
- Ep
- Epoxy floor
- Europe
- Evaporator
- Exide
- Factory Markings
- Fender Skirt
- Floor
- Flushing
- Flyer
- Foam
- For Sale
- Front AXLE
- Front brakes
- Front bumper filler
- Front Floor
- Front wheel bearing
- Fuel Filter
- Fuel Pump
- Fuel Sending Unit
- Fusible Link
- Garage
- Garage Cabinets
- Gasket
- GE
- Gear indicator
- General Time
- Glove box light
- Grand European
- H4
- Haus of Hot Rod
- Headlight Actuator
- Headlight doors
- Headlights
- Heater Core
- Heater Hose
- Heater Valve
- High Idle
- History
- Holley
- Honest John
- Hood
- Hood Emblem
- Hood Ornament
- Hose Clamp
- Hot Choke
- Hot Water Valve
- HotRod
- How to
- Hödlmayr
- Ignition Diagram
- Illuminated Entry
- John D‘Agostino
- John Foust
- Klassikwelt Bodensee
- Kremsmünster
- LaSalle
- Leather seats
- Light Switch
- Limited
- Lincoln
- Lincoln Mark III Repair Tip
- Low Mileage
- Magazine
- Marilyn Monroe
- Mark III
- Master Cylinder
- Master Switch
- Master Vacuum Switch
- Media Blasting
- Meeting
- Meguiras
- MK II
- Mobile
- Model
- Moldings
- Mom
- Mopar Nationals
- Mostkost Kustom
- Movie
- Munich
- Neon
- NOS
- Oberösterreicher des Tages
- oilchange
- ORF
- Overspray
- Pacer
- Paint
- Paint correction
- Paintjob
- Part Number
- Parts
- Patch Panel
- Perfect Circle
- Permabag
- Persian Lime
- Photo shooting
- Photoshooting
- Pictures
- PinUp
- POA Valve
- Power Antenna
- Power Servo
- Power Vent Windows
- Power Window
- Printed Circuit Board
- Programmer
- Pulley
- Quadrajet
- Quarter Panel
- Quartz Conversion
- R134
- Radiator
- Radio
- Rattle
- Rear brakes
- Rebuild
- Recalibrate
- RediRad
- Reed Switch
- Relais
- Relaunch
- Removing Overspray
- Repaint
- Repair
- Restoration
- RIP
- Roadhouse
- Roadmaster
- Rochester
- Rocker Arm Cover
- Rocker Panel Extension Clips
- Rostio
- Rotary Valve
- Rotterdam
- Rupes
- Rust removal
- Rust removal gel
- Sabre Wheels
- Sand Blasting
- Sandblasting
- Screed
- Season Greetings
- Seasons Greetings
- Seat Back Locks
- Seat Padding
- Seat Transmission
- See through ornament
- Self adjusters
- Self Starter
- Sepp's Garage
- Seville
- Sheetmetal
- Shocks
- shop manual
- short
- Sign
- Solenoid
- Spark Plug Wire Routing
- Speakers
- Special Award
- Speed Bleeder Screws
- Splash Guard
- Starter Diagram
- Starter Motor
- Steering Column
- Storage
- suction throttling valve
- sunroof
- suspension
- Swirl Mark removal
- Switzerland
- T3
- Taillight Cover
- Texan´s Choice Award
- Thermostat
- Tilt and Telescope
- Time capsule
- Tomsclub
- Torque Specifications
- Tower Hose Clamp
- Towtruck
- Trailer
- Transducer
- Transmission
- transmission control selector
- transmission control selector indicator light
- transmission shift indicator
- Treadle Vac
- Treffen
- Tri-Band
- Troubleshooting
- Trunk Cardboard Kit
- Trunk lid
- Trunk lining
- Trunk to bumper cover
- Turn Signal Switch
- TV
- Typisierung
- Ultimate Garage
- Underbody
- Undercarriage
- Undercoating
- Undercoating Removal
- Vacuum Booster
- Vacuum diagram
- Vacuum hoses
- Vacuum Master Switch
- Vacuum Schematic
- Vacuum Valve
- Valve Cover
- Various
- Vent Window Switch
- Vibration
- Vibrator
- Vicodec roof
- Video
- Vinegar
- Vinyl Roof
- Visitor
- Washer Fluid Float
- Washer Fluid Low Level Indicator
- Water Pump
- Wax
- Weatherstripping
- Website News
- Westclox
- Wheel Bearings
- Wheel Housing
- Wiesbaden
- Windlace
- Winter
- Wiring
- Wiring Diagram
- Wonderbar
- Workbench
- Zurzach
 GERALD´S CADILLACS - NEWS